
Floor Screeding for LVT: Why Professional Subfloor Preparation is Vital

What if the most important part of your stunning new designer floor is the layer you'll never actually see? When you've spent weeks choosing the perfect earth-toned planks or a classic herringbone pattern, it's frustrating to hear that you need to invest in professional floor screeding for LVT. You might be worried about the added cost or confused by technical talk of latex versus water-based compounds. It's tempting to think that a thick vinyl tile will hide a few minor bumps in the concrete, but the reality is often quite different.
We understand that you'd rather not worry about technical jargon or hidden costs when you're trying to improve your home. This guide shows you why professional subfloor preparation is the secret to a flawless, long-lasting installation that won't bubble or show imperfections later. We'll explore the differences between latex and water-based screeds, explain the importance of British Standards, whilst helping you understand the professional timeline required for a glass-smooth finish that stays beautiful for years.
Table of Contents
What is Floor Screeding for LVT and Why is it Necessary?
Many homeowners are surprised to learn that the floor they walk on isn't just the vinyl tile itself. It's actually a carefully engineered system of layers. Professional floor screeding for LVT, often referred to by fitters as a smoothing or levelling compound, is the specialised layer applied to your structural base to create a perfectly flat foundation. To understand the basics of the material itself, you might ask What is Floor Screed? Whilst a structural screed is a thick layer used to level a building's base, the smoothing compounds we use for Luxury Vinyl Tile are thinner, high-performance materials designed to eliminate every tiny imperfection before the tiles are laid.
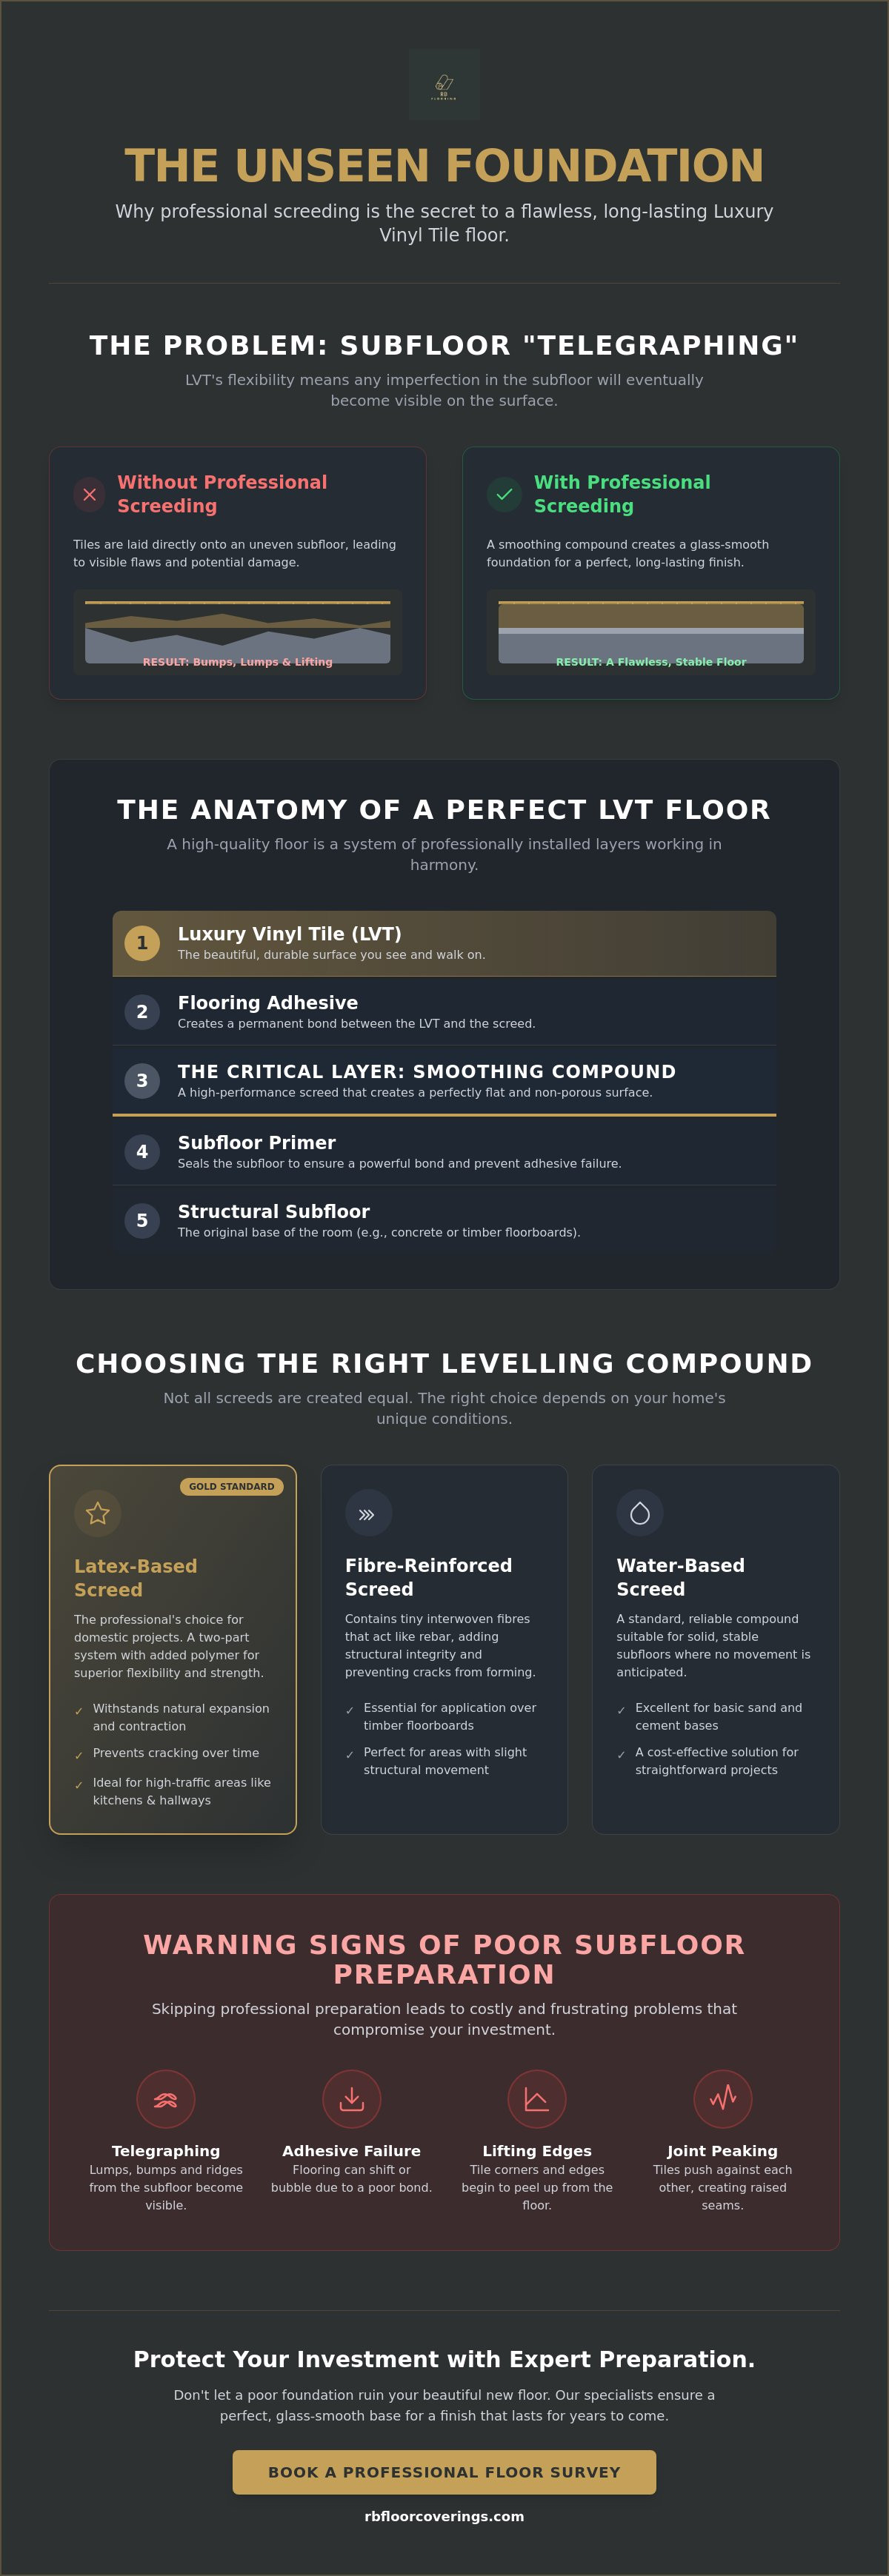
The primary reason we insist on this process is to prevent the "telegraphing" effect. Luxury Vinyl Tile is incredibly flexible. While this flexibility makes it durable and comfortable underfoot, it also means the material acts like a second skin over your subfloor. If there's a stray grain of sand, a ridge of old adhesive, or a tiny pit in the concrete, the vinyl will eventually sink into or wrap around that shape. Over time, as light hits the floor at an angle, you'll see every lump and bump mirrored on the surface. It's an aesthetic nightmare that can be entirely avoided with the right preparation.
Beyond looks, screeding provides a consistent, non-porous surface for your flooring. Raw concrete is often dusty or overly absorbent, which can "starve" the adhesive of the moisture it needs to bond correctly. A professional screed ensures the glue sticks to the tile and the floor with equal strength, preventing your floor from shifting or lifting over time.
The Science of Subfloor Preparation
Even a floor that looks flat to the naked eye usually isn't. When we run a professional straight edge across a room, we almost always find "valleys" and "peaks" in the concrete. Screed flows into these low points, creating a level plane across the room's centre. This is vital because modern LVT joints are precision-engineered. If the floor dips, those joints are put under constant stress every time someone walks over them. This eventually leads to joint failure or "peaking" where the tiles start to push against one another.
Screed vs. Underlay: Can You Skip the Wet Work?
It's a common question: can't I just use a thick underlay? For glue-down LVT, the answer is a firm no. Traditional carpet underlay is soft and bouncy, which is the opposite of what a rigid vinyl tile requires. LVT needs a solid, stable foundation to perform. Whilst some floating LVT systems use a thin, specialised underlay, they still require a flat subfloor to prevent a "springy" feel. Investing in proper floor screeding for LVT now is the only way to guarantee the long-term stability of your new floor.
Choosing the Right Levelling Compound for Your Subfloor
Selecting the correct material is the difference between a floor that lasts decades and one that fails within months. Whilst DIY-grade products are often marketed as "one size fits all", professional floor screeding for LVT involves choosing a compound specifically engineered for your home's unique conditions. The choice typically depends on the subfloor material, the level of moisture present, and how quickly the area needs to be back in use.
Standard water-based compounds are excellent for basic sand and cement bases where movement isn't a concern. However, for most domestic renovations, we opt for more advanced solutions. Fibre-reinforced screeds are essential when working over timber floorboards or areas where slight structural movement is expected, as the tiny fibres act like internal reinforcement to prevent the screed from snapping. If you're on a tight schedule, fast-track screeds allow us to install your flooring much sooner than traditional drying times would normally permit.
Latex Screed: The Professional's Favourite
Latex-based compounds are widely considered the gold standard for high-traffic domestic areas like kitchens and hallways. Latex screed is a two-part system involving a powder and a liquid polymer that are mixed together on-site. This polymer gives the finished surface a degree of flexibility that water-based alternatives simply can't match. This flexibility allows the floor to withstand the natural expansion and contraction of your home without cracking or losing its bond with the subfloor. When you book a floor survey with a specialist, they'll determine if a latex solution is the best fit for your specific space.
Specialist Solutions for Challenging Floors
Older properties in Sheffield often present unique challenges that require more than a standard levelling compound. For severely uneven floors, we use deep-base compounds that can be poured up to 50mm thick in a single application without shrinking. In homes where rising damp is a concern, moisture-tolerant screeds provide a vital barrier that prevents water vapour from reaching your LVT adhesive. We also utilise thermal-conductive screeds specifically designed for underfloor heating systems, ensuring heat is transferred efficiently and evenly to the surface. Ensuring the right product is selected is a core part of meeting the British Standards for subfloor preparation, which dictates the tolerances required for a professional finish.
The Professional Screeding Process: What to Expect
Achieving a flawless result with floor screeding for LVT is a precise science that goes far beyond simply pouring a bag of compound onto the floor. While some online tutorials might lead you to believe the material is entirely "self-working", the reality is that professional results come from a disciplined sequence of events. We treat the subfloor as the most critical part of the installation. If the foundation isn't right, the final tiles never will be. Preparation actually accounts for about 70% of the total labour involved in a high-quality fit.
Step 1: Subfloor Assessment and Cleaning
In many older South Yorkshire properties, we often encounter subfloors with decades of history. This includes stubborn bitumen adhesive, old carpet glue, or loose floorboards in terraced homes. We begin by mechanically removing these contaminants and vacuuming away every speck of dust. We then use a digital hygrometer to test moisture levels in concrete bases, ensuring they're below the required 75% Relative Humidity. For timber floors, we check for any "bounce" or deflection, as movement can cause even the best screed to crack if it isn't properly reinforced with the right compound.
Step 2: Priming and Pouring
Priming is a non-negotiable stage of the process. It seals the subfloor, preventing the compound from losing its moisture too quickly into the substrate. If you skip this, the screed will often develop pinholes and unsightly bubbling. Once the primer is tacky, we mix the compound to a perfect consistency and pour it across the area. Professionals use a spike roller to release trapped air and a gauging rake to ensure a consistent depth. Technical specifications for Floor screeds vary depending on whether the application is bonded or unbonded, but the goal is always a level finish that meets strict British Standards.
Step 3: Curing and Sanding
Control of the environment is vital during the first few hours of curing. We always advise clients not to open windows or turn on the heating immediately. Drafts and sudden temperature changes cause the screed to dry unevenly, which often leads to surface cracking. It's also vital to distinguish between "walk-on" time (usually 2 to 4 hours) and "lay-on" time, which is when the moisture levels are safe for the LVT to be glued down. Once cured, we often lightly sand the surface to remove any "laitance" or minor ridges. We pay particular attention to feathering edges, which involves creating a smooth, tapered transition between different rooms to ensure your floor screeding for LVT provides a truly glass-smooth canvas.
Common Pitfalls: The Risks of Poor Subfloor Prep
Skipping the preparation stage might save a few pounds initially, but it often leads to a series of expensive and frustrating failures. When floor screeding for LVT is ignored, the most immediate issue is telegraphing. This occurs when every grain of sand, old adhesive ridge, or uneven floorboard joint eventually mirrors through the vinyl. Because LVT is designed to be thin and flexible, it doesn't bridge gaps; it settles into them, highlighting imperfections that were invisible during the initial fit.
Adhesive failure is another significant risk. If the subfloor is dusty, porous, or unprimed, the glue won't form a permanent bond. This leads to "peaking", where the tiles start to lift at the edges or push against each other. In some cases, using the wrong type of screed on a flexible timber floor results in delamination. This is where the screed itself cracks and pulls away from the wood, creating a crunching sound when you walk across the room and eventually causing the tiles to come loose.
The "ghosting" effect is perhaps the most deceptive pitfall. Moisture trapped beneath the LVT can cause dark patches or discolouration to appear on the surface of your beautiful new floor. Whilst the tiles themselves are resilient, the trapped humidity creates an environment for mould or chemical reactions with the adhesive. LVT is waterproof from the top, but vulnerable to moisture from the subfloor. This is why we always conduct thorough moisture tests before any work begins.
The Cost of Cutting Corners
Rectifying a failed subfloor is far more expensive than doing it right the first time. It usually involves uplifting the entire floor, scraping away failed compound, and starting from scratch. Most LVT manufacturers also make their warranties conditional on the subfloor meeting BS 8203 standards. If your floor fails because of poor prep, you'll likely find your warranty is void. Professional installers in Rotherham use specific mixing techniques and tools to avoid "pockmarking", those tiny craters caused by air bubbles that can ruin the finish of a DIY job.
Addressing the Moisture Objection
Some homeowners believe that a concrete floor that feels dry is safe to cover. However, concrete can hold significant amounts of "residual" moisture that only escapes once a floor is sealed. If our tests show high humidity, we must apply a liquid Damp Proof Membrane (DPM) before the screeding process. This creates a permanent barrier that protects your investment from rising damp. If you're worried about the condition of your subfloor, contact our team for a professional assessment to ensure your installation is built to last.
Expert LVT Installation in Sheffield and Rotherham
RB Floor Coverings takes the stress out of your renovation by managing every stage of the process. We handle everything from the initial uplift of your old flooring to the final, precise application of floor screeding for LVT. Our team understands that homeowners often feel overwhelmed by technical requirements and industry jargon. We simplify the experience by providing a single point of contact for both supply and installation. This end-to-end oversight ensures that the craftsman fitting your tiles is the same person who prepared the subfloor, guaranteeing accountability and a truly seamless finish.
Our unique mobile showroom brings the selection process directly to your doorstep in Sheffield, Rotherham, or Worksop. This isn't just about convenience; it allows us to perform a preliminary subfloor assessment whilst you browse our range of samples. We can identify potential issues, such as uneven timber boards or residual moisture in concrete, before you even place an order. This proactive approach eliminates the risk of unexpected costs or delays once the installation begins, positioning us as a reliable partner for your home improvement.
Tailored Solutions for Local Homes
South Yorkshire's housing stock is incredibly varied, and we adapt our methods to suit every property type. We regularly work in Victorian terraces where floorboards have settled over a century, as well as modern new builds where concrete bases require careful moisture management. As experienced luxury vinyl tile installers Rotherham families trust, we know exactly which compounds to use for a lasting bond. Achieving a glass-smooth base is particularly vital for herringbone LVT installation Rotherham projects, where geometric patterns will highlight any subfloor deviation. We also provide specialist luxury vinyl tile fitting Sheffield residents rely on for durable, high-performance results in high-traffic areas.
Book Your Home Consultation Today
Choosing a new floor should be an exciting experience, not a technical headache. When we visit your home, we provide an honest, expert assessment of exactly what your subfloor requires to support your chosen LVT. We'll measure your space with precision and explain why specific floor screeding for LVT is necessary for your particular room. This transparency builds the trust that has made us a reliable local specialist for domestic and commercial clients alike. Book your professional floor measurement and LVT consultation with RB Floor Coverings to start your project with confidence and ensure a finish that looks perfect for years to come.
Secure the Future of Your Stunning New Floor
Investing in high-quality Luxury Vinyl Tile is only the first step toward a beautiful home. The true secret to a floor that looks as good in ten years as it does on day one lies entirely beneath the surface. Professional floor screeding for LVT ensures that every imperfection is smoothed away, preventing unsightly bumps and protecting your manufacturer's warranty. Whether you're dreaming of a modern plank or a complex herringbone pattern, a flawless foundation is the only way to avoid the risks of adhesive failure or moisture damage.
Since 2018, we've helped residents across Sheffield, Rotherham, and Worksop achieve these results with quiet competence. Our team specialises in intricate layouts and understands the specific requirements of both Victorian floorboards and modern concrete bases. Every project begins with an expert subfloor assessment, ensuring we select the perfect materials for your home's unique conditions.
Book your free home consultation and subfloor assessment with RB Floor Coverings today. We'll bring our mobile showroom to your doorstep, providing an honest evaluation of your subfloor whilst you browse our latest collections. Let's work together to create a durable, glass-smooth finish that you'll be proud of for years to come.
Frequently Asked Questions
Do I really need to screed my floor before laying LVT?
Yes, you almost certainly need to screed if you want a professional, long-lasting finish. Luxury Vinyl Tile is a flexible product that mirrors every imperfection in the base beneath it. Without a smooth layer of floor screeding for LVT, you'll eventually see every pit and ridge in your concrete through the tiles, a problem known as telegraphing that ruins the aesthetic of your new floor.
How long does floor screed take to dry before I can walk on it?
Most professional screeds allow you to walk on the surface within 2 to 4 hours. However, you shouldn't confuse "walk-on" time with "lay-on" time. It usually takes at least 24 hours for the moisture to leave the compound completely before we can safely apply the LVT adhesive and tiles. This timeline ensures the bond between the tile and the floor remains secure.
Can you screed over old floor tiles or do they need to be removed?
It is often possible to screed over old ceramic or porcelain tiles if they are structurally sound and firmly bonded to the floor. We apply a specialised primer to the tiles first to ensure the new compound sticks correctly. If the old tiles are loose or cracked, we always recommend removing them to ensure a stable foundation that won't shift over time.
What is the difference between self-levelling compound and floor screed?
In the flooring industry, "floor screed" often refers to the thick structural layer of sand and cement, whilst "self-levelling compound" is the thin, liquid-like product used to prepare a surface for LVT. Most fitters use these terms interchangeably when discussing subfloor preparation, but for LVT, we are specifically using high-performance smoothing compounds designed for a glass-smooth finish.
Can I screed over wooden floorboards for an LVT installation?
You can absolutely screed over wooden floorboards, but you must use a fibre-reinforced compound. These products contain tiny fibres that provide internal strength and flexibility. This allows the screed to handle the natural movement of timber boards without cracking, which is a common issue we encounter in many older South Yorkshire properties.
How much does professional floor screeding for LVT typically cost?
The cost of floor screeding for LVT depends on the size of the area and the condition of the existing subfloor. Factors like the depth of the pour and whether a damp-proof membrane is required will influence the final price. We provide detailed assessments during our home visits to give you an accurate idea of the work required for your specific room.
Is it possible to DIY floor screeding for a small room like a bathroom?
We strongly advise against DIY screeding, even in small areas like bathrooms. These compounds set incredibly quickly, often within 15 minutes, leaving very little room for error. A professional has the tools and experience to mix the material to a perfect consistency and trowel it to a glass-smooth finish before it begins to harden and become unworkable.
Does screeding help with underfloor heating efficiency?
Screeding significantly improves the efficiency of underfloor heating systems. The compound acts as a thermal conductor, wrapping around the heating elements to ensure heat is distributed evenly across the floor. This eliminates "cold spots" and helps your room reach the desired temperature more quickly whilst protecting the vinyl tiles from direct heat stress.


Comments